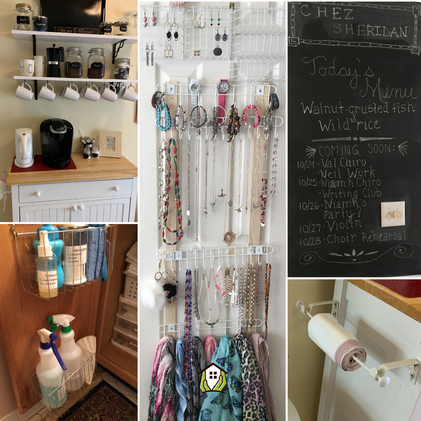
 Clockwise from upper left: coffee station, jewelry organizer, chalkboard wall, garbage bag/paper spool, cabinet door rack Clockwise from upper left: coffee station, jewelry organizer, chalkboard wall, garbage bag/paper spool, cabinet door rack Home stores are making a killing marketing tools and gadgets to help you save space and organize your cabinets, closets and drawers. The problem, aside from their pricetag, is that many of them turn out to be uni-taskers, that is they can only be used for a single purpose. When your needs change, many of these specialized items are no longer useful and merely clutter up your home...which is the very last thing you need when trying to restore some order. This week, I want to share with you just a few of my favorite DIY organizing tools that are not only helpful space-and-sanity-savers but also very easy and economical to make yourself. These are just a few examples. With a little creativity and resourcefulness, you can come up with more of your own just by looking through your pile of excess stuff with an inventive eye. I am listing the materials I used for each of the projects below and have estimated what it would cost if you had to purchase them all. However, it is my hope that you will be able to use whatever you already have on hand or acquire items for free from friends or neighbors who may have some to spare to reduce your costs...perhaps down to nothing. Substitutions are encouraged! Your local Nothing Project or Freecycle groups can be great resources for scoring free materials. (See the photos above for reference.) Jewelry Organizer Keep jewelry easily visible, accessible and tangle-free while saving boatloads of space in your bedroom with this simple DIY organizer you can hang on the inside of your closet door. Cost: Approximately $10 Materials:
Cabinet Door Rack Increase storage space in the kitchen and bathroom for as little as $1 with this quick and easy project. You’ll want one for every cabinet in your home. Cost: under $5 Materials needed:
Tip: Increase the versatility of these wire door racks by fitting them with small plastic cups or jars that can hold items that would otherwise slip through the wires. Garbage Bag/Paper Spool This clever trick keeps rolls of garbage bags, food wraps, paper towels, and wrapping paper at your fingertips and saves space in your overflowing cabinets! Cost: You can make several for about $7 total Materials needed:
Chalkboard Wall Keep everyone in your household on the same page with a fun chalkboard wall. Why limit yourself to one chalkboard when you can have an entire wall to write messages, share important info, and keep track of upcoming events, all in a central spot in your home. Cost: About $8 Materials Needed:
Coffee Station Set up a cute coffee station in your kitchen or dining room to save oodles of kitchen cabinet space and make it easy for guests to help themselves to hot beverages when you entertain. Cost: varies
These projects are just the tip of the iceberg. Unleash your creativity and see what you can create to suit your organizing needs using stuff you already own. Convert a storage trunk into a filing cabinet or a piano bench into a giant jewelry box. Make a scarf hanger by taping shower curtain rings onto a hanger. Send photos of your creations to [email protected] or tell us about them in the comments. Visiting Pinterest for ideas before ordering fancy organizers online can save you lots of money you can use on something way more fun than organizing your closets or pantry! Don’t miss next week’s blog, where I’ll tell you how to shop smart and get more bang for your buck out of the stuff you own so that you can own less stuff.
0 Comments
 If you’ve ever been inside The Container Store or gone shopping for new food storage bins for your pantry, you know just how overwhelming -- and expensive! -- it can be to purchase the tools all those home magazines say you need to get organized. It’s enough to scare off even the best-intentioned from getting started. So my first piece of professional advice when it comes to shopping for baskets, bins and drawer dividers to create order in your home is...just don’t. At least, not yet. And maybe never. For starters, acquiring more stuff, no matter what it is, is probably the very last thing that will improve your situation. Most people already have way too much stuff, which is a primary factor leading to the current disorder in their homes. Purchasing more will only exacerbate the problem. Secondly, you can’t possibly know what to buy until you know how and where you will be using it. Guessing (and likely guessing wrong) will cost you time and money you may not have and lead to greater frustration. I’m assuming you already have plenty of that, am I right? Finally, your shopping excursion will feed into the false notion that it is a lack of organizing tools that has created the disorder in your home rather than the lack of an organizational plan. I’m sorry to tell you that there is no magical invention sold in the home goods section that will transform your chaos into calm without a solid understanding of how you use your space and a plan that reflects this. Now that we’ve dispensed with what you shouldn’t do, let’s turn our attention to what you should. Obviously, you’re going to need a place to put all your stuff once you’ve purged your excess and sorted it into tidy categories. The good news is that with a little resourcefulness and a smidgen of creativity, it doesn’t have to cost you a single red cent to organize your home. Start by raiding your recycling bin for jars, boxes (shoe boxes are great), plastic containers of varying sizes, and old shopping bags. Gather some ziploc bags, scissors, tape, a stapler, a few labels (or blank paper if you don’t have any) and a marker. You are now ready to begin purging your excess stuff, sorting what’s left into categories and designating homes for each category according to how you use it and how accessible it needs to be. Once you know where you want to store your items, select or create holding spots or dividers as needed to keep them neatly separated and labeled using the materials you’ve gathered. Need drawer dividers? Make some using strips of cardboard and some tape. No crock to hold all your large kitchen utensils? No problem. Just grab a large jar, flower pot, or an old pitcher. Lots of earrings but no jewelry box? Repurpose a box grater to hold the danglers and a small glass dish for your studs. You are limited only by your imagination. Yes, I hear you...you want a pantry worthy of Instagram, with matching jars labeled using trendy fonts. The good news is that if that’s your thing, you can still have it. The even better news is if that’s not your thing, or if you can’t afford that level of luxury, you can keep your homespun organizing solutions until you can...or forever. The functionality will still be there, and if the cardboard tears over time, there’s plenty more where that came from. Either way, you end up saving money by testing out your new organizing system without investing any money in pure aesthetics. If you plan to upgrade later, start making a wish list now of the organizing tools you want to purchase. Include specifics like what size, shape, material, color you want that will work in your space. If you used a transparent container to store something but are bothered by the visual noise, make a note to purchase an opaque version. If stacking your open bins would save more space in the cabinet, consider buying ones with lids. The longer you wait to go shopping, the more likely you’ll make wise choices to suit your needs once you do. Save big bucks and add a personal touch to your space by repurposing purely sentimental objects into functional ones. This is an excellent way to place the object in your path where it will trigger all those wonderful memories instead of consuming valuable storage space in the back of a closet where you will rarely encounter it. You’ll be amazed how easy it is to divide your spaces, create holders for items both large and small, establish zones, extend your storage, and make items more accessible by using everyday objects you already have lying around your home. Here is just a smattering of examples:
Don’t let a lack of fancy organizing tools or funds to purchase them delay you from getting started in restoring some order to your home. Visit my Organizing Outside the Box board on Pinterest to get more ideas for using everyday objects instead. If, after that, you still need to acquire something to get the job done, don’t overlook your local neighborhood giveaway groups, yard sales, thrift shops and dollar stores as viable sources. Remember, you probably won't be giving your guests a tour of your drawers and closets, so save your money for decorating the areas they are more likely to notice. Next week, I’ll share some of my favorite easy peasy and economical DIY tools for creating more space and order in your home. Until then, keep it easy peasy!  “We do not inherit the earth from our ancestors...we borrow it from our children.” -Native American Proverb April 22 is Earth Day...the day we honor and celebrate our beautiful planet! I love Earth Day because this living, breathing, incredible home is the one thing all of us--regardless of race, culture, religion, political ideology, sexual orientation, nationality, or even species--share. This enduring world sustains us, and during the month of April, there are always endless opportunities to return the favor by nurturing nature, conserving and replenishing our natural resources, and cleaning up after ourselves. And speaking of cleaning up after ourselves, one of the easiest ways we can show Planet Earth some love all year long is to reduce our dependence on harsh chemicals when cleaning our homes. In the early days of the Coronavirus pandemic, there was a heavy emphasis on sanitizing and disinfecting every surface, as fomite transmission was thought to be one way the virus was spread. Scientists have since learned that transmission of the virus through contaminated surfaces is relatively rare. Still, many of us are continuing to overuse chemicals because it makes us feel better. A more effective way to protect ourselves is by improving ventilation, wearing a mask when out in public, social distancing and frequent hand-washing. Definitely once you are vaccinated against SARS-CoV2, you might want to cut back a bit on the harsh disinfectants that can also harm your health and the environment. “Green cleaning” our homes is also more convenient and easier on your wallet. With just a few versatile ingredients--most of which you probably already have on hand--you can mix up your own non-toxic cleaning solutions anytime you need them. Compare the cost of a single batch of the commonly-used, chemical-laden cleaners below to the simple, everyday ingredients needed to make multiple batches of the environmentally-friendly versions: Store-bought Solutions: Tilex - $3.99 Windex - $3.19 Comet - $.99 Fantastik - $4.99 Murphy's Oil Soap - $3.49 Windex Electronics Wipes - $2.99 Tide Liquid Laundry Detergent - $8.79 Shout Stain Remover - $2.97 Clorox Automatic Toilet Bowl Tablets - $4.99 Clorox Wipes - $4.99 Total Cost - $54.54 Homemade Ingredients: White Vinegar - $1.99 Water - FREE Rubbing Alcohol - $.99 Borax $4.49 Dawn Dish washing Liquid - $2.50 Ammonia $.99 Salt - $.89 Citric Acid - $2.97 Castile Soap with Tea Tree Oil - $6.69 Washing Soda - $3.97 Lemon Essential Oil - $6.99 Total cost - $32.97 Savings - $21.57 (That’s a 40% savings on just the first batch, plus you’ll have enough ingredients leftover to make additional batches for free!) Cutting back on the chemicals in the cleaning solutions you use is just one way green cleaning helps the environment and saves you money. Consider the benefits of recycling as you clean. For example, instead of buying a new spray bottle of commercial glass cleaner or a jug of laundry detergent every month, refill your own spray bottle and jug with the homemade versions to reduce the amount of plastic your family consumes. Keep all those disposable disinfecting wipes out of the landfill by replacing them with reusable cleaning cloths. Recycle old newspapers for cleaning your windows. Heck, you can even put that old mateless sock to good use over and over again on your Swiffer in place of buying the disposable sweeper cloths. When your t shirts, towels, cloth napkins, and dish towels become worn and ratty, downgrade them to cleaning rags. I save the worst-looking ones that are truly nearing the end of their usefulness for washing the car or in place of paper towels for cleaning up the yuckiest messes before finally pitching them. My family has been green cleaning for several years now and my house feels, looks and smells as fresh and germ-free as ever. I never have to worry about running out of cleaning supplies, and have saved a bundle of money! The best part is that the solutions we use are safe enough for my kids to help with the cleaning chores without the worry of exposing them to dangerous harsh chemicals. Now that’s a win! Below are some of my favorite green cleaning "recipes". For best results, store them in glass containers whenever possible (especially if the recipe contains borax, which can weaken plastic over time and create leaks). Some ingredients may be harmful if ingested. Keep solutions away from pets and always supervise small children when using. Hydrogen Peroxide (the king of green cleaners!) You don't even need to mix up a solution for this one! This little miracle cleaner has anti-bacterial, anti-viral, anti-mold, anti-fungal and anti-mildew properties and is non-toxic and environmentally-friendly. Use it to:
All-Purpose Cleaner 3/4 c. vinegar 1/2 c. rubbing alcohol 1/2 c. water 5-6 drops Castile Soap w/essential oil This is great for cleaning kitchens and bathrooms. May not be suitable for all surfaces. Mix all ingredients together in a spray bottle. Shower/Tub Cleaner 1 cup Dawn 1 cup white vinegar Spray over soap scum-coated surfaces and allow to sit for about 20 minutes. Scrub and rinse clean. (This stuff can be difficult to breathe...be sure to turn on your exhaust fan and/or open a window when using.) Glass & Chrome Cleaner 1 c. vinegar 1 c. water Spray onto newspaper or slightly crumpled coffee filters and wipe onto windows, mirrors and chrome in a circular motion. Scouring Powder 1 c. baking soda 1/2 c. salt 1/2 c. borax Works well on kitchen and bathroom sinks and toilets. Sprinkle generously before scrubbing with a brush. Note: this is an abrasive substance and may scratch some surfaces. Do not use on wood. Sink Paste 3/4 c. baking soda 1/4 c. castile soap 1 T. vinegar 1 T. Borax 1 T. water 3-5 drops tea tree oil Store paste in a small glass jar with tight-fitting lid. Dip clean dish brush into paste and scour porcelain or stainless steel sinks. Rinse clean. Quick Counter Cleanup Rags 3 c. hot water 2 T. castile soap 1 T. borax 1 cup vinegar 8-12 folded rags I keep a jar of these at the ready to wipe up everyday spills and crumbs from my kitchen counter and table. Layer half of the rags in a large glass mason jar with tight-fitting lid. Combine other ingredients in a large glass measuring cup or pitcher and pour half over the folded rags in the jar. Layer the remaining rags on top and pour remaining liquid over top, making sure all the rags are saturated. Keep closed and use within two weeks. Laundry Stain Remover 2/3 cup Dawn 2/3 cup ammonia* 6 T. baking soda 2 cups warm water *NEVER COMBINE AMMONIA WITH PRODUCTS THAT CONTAIN BLEACH! Spray onto stain and gently rub (not too hard, or you may cause discoloration) before laundering as usual. Laundry Detergent 3 T. Dawn or Castile Soap 3 T. Borax 3 T. Washing Soda 4 cups warm water Combine all ingredients in glass container. Shake before using. 1/4 cup per large load. Electronics Screen Cleaner 1 part distilled water* 1 part distilled white vinegar Lightly spray cleaner onto a microfiber cloth and gently rub screen to clean. Do not spray directly on device. *Use only distilled water! Wood Floor Cleaner 1 cup white vinegar 1 cup water 1 teaspoon olive oil Combine ingredients into spray bottle. Spray onto wood floor and wipe clean with a dry cloth. Use no more than once/month. Use a simple solution of vinegar and water for weekly cleaning in between. Toilet Bombs 1/4 cup citric acid 1 cup baking soda White vinegar 15 drops lemon essential oil Combine all ingredients in large bowl and press into ice cube tray. Allow to dry completely overnight. Remove from tray and store in a large glass jar with tight-fitting lid. To use, drop tablet in toilet and let sit for 5-10 minutes; then scrub with toilet brush and flush. Clean back, base and seat of toilet with All-Purpose Cleaner. With a few simple ingredients and the right attitude, even spring cleaning can be easy peasy! Got an earth-friendly cleaning tip to share? Email us at [email protected] Don't miss out! Sign up to have each new EPL Blog post delivered to your inbox each week.
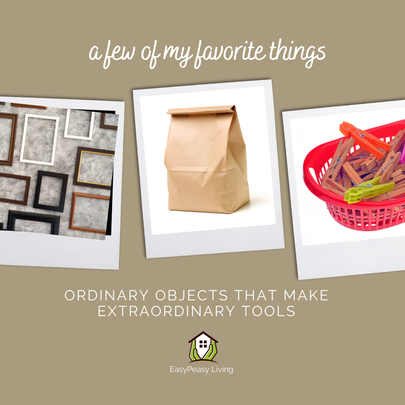 One of the most common questions I get is “What organizing tools should I buy to get started?” My answer is simple: “Nothing!” You don't have to spend a lot of money getting organized. While it may be tempting to purchase cute canisters for your pantry or boutique baskets for your closet, it is wiser to spend your decorating dollars on the spaces your guests will actually see than on organizing the stuff that's kept hidden behind closed doors. And contrary to popular belief, all those cute bins and cool gadgets from The Container Store don’t come with a lifetime supply of magic fairy dust that will automatically transform your home into an orderly oasis. Not to mention that going on a pre-organizing shopping spree, while a fun way to procrastinate on actually tackling your project, can end up becoming overwhelming and wind up adding to your problem of having too much stuff. The good news is that you are likely already surrounded by the best, most versatile tools on the market...you just don’t realize it! And all these items are easily adaptable if/when your needs change, unlike that task-specific gadget you paid too much for at your favorite home goods store. December is Top Tips Month here at EasyPeasy Living, and this week I'm sharing 16 of my favorite things...ordinary, everyday objects most people already have lying around the house that, with a little creativity, you can transform into extraordinary tools for staying organized or just making life a little easy peasier. Be sure to follow @EasyPeasyLiving on Facebook and Instagram, where I’ll be sharing my top five most favorite favorites in the coming week. I may not have a magic wand, but these little gems are the next best thing. First a word of caution: resist the temptation to hoard any of these. Most will be in pretty constant supply, so you can afford to wait until you have a specific need to begin collecting. OK, here we go! Bread Clips I recently saw a picture of a wedding gown made from 10,000 plastic bread bag clips. That may be a bit extreme, but there are lots of practical uses for these little plastic doohickies:
Candle Jars I love lighting candles to cozy up my home on long winter nights! From October through March, I enjoy snuggling up in front of their warm glow each evening. My favorites are the jar candles because they are less messy, keep their shape, and - best of all - the glass jars can be cleaned out and re-purposed to store all manner of things once the candle inside has burned itself out. Jar candles come in so many shapes and sizes, so the storage opportunities are endless. You can even fill them with something wonderful and gift them! Some of my favorite things to store in them:
Contact Lens Cases Do you get a new case every time you buy solution? Don’t throw the old one out! These miniature lidded containers yield super-sized space savings and convenience, especially when travelling. Tuck them into your purse, backpack, fanny pack, suitcase or camping gear. Here are just a few of the many things you can store in them:
“Disposable” Food Storage Containers (such as Take-Along or Ziploc containers): Closet and cabinet organizing is all about function and how to fit, find and access what you need as efficiently as possible. That's why I love these inexpensive containers for storing everything from pretzels to pencils. They come in varying sizes and are transparent, airtight, versatile, stackable and easily labeled. Best of all, you can pick up as many as you need for next to nothing and easily find them at most stores that sell housewares or groceries. Or just go "shopping" in your recycle bin. Divided Boxes Keeping small items organized can be a challenge. I love it when a gift or purchase comes packaged in a box with dividers, but you can also purchase plastic divided boxes at most craft stores or home goods stores that are stackable and easily transportable. Here are just a few ideas of things to store in them:
Life changes fast. Sometimes you need a low-tech communication device that travels well and can change right along with it. The dry erase marker isn't just for white boards, my friends!
Eyeglass Cases Both the open-ended, soft kind or the hard, hinged eyeglass cases make great storage receptacles for so many objects inside your drawers, purse, backpack or suitcase. Here are just a few things you can store inside them:
Hydrogen Peroxide One of the best ways to save space is to equip yourself with multi-taskers. Why buy and store a gazillion different toxic and expensive cleaners, stain removers, disinfectants, and whiteners when all you need is one bottle of this multi-purpose miracle? (Well okay, you should probably buy more than one bottle of it for all these uses.) Hydrogen peroxide has anti-bacterial, anti-viral, anti-mold, anti-fungal and anti-mildew properties and is non-toxic and environmentally-friendly. And while it may be worth its weight in gold, it has a price tag you'll love almost as much as its versatility. Use it to: Disinfect/Sterilize:
Lazy Susans Let's face it...we are all lazy about something. Embrace your laziness and make it work for you! These little turntables come in a variety of sizes. A few places they can help you spin into action instead of spinning your wheels include:
Mason Jars There's a reason our mothers and grandmothers kept a supply of these around! They’re economical, environmentally-friendly, reusable, versatile and inexpensive! Sold in most grocery or home goods stores by the dozen for about a buck per jar, they are a worthwhile investment. Or just befriend someone who likes to give homemade jam as gifts! Here are just some of the many ways you can use them around the house:
Paper Bags I always keep a stash of these on hand because they are so versatile. In addition to the obvious, use them for:
Picture Frames They say a picture paints a thousand words, but a picture frame can say a lot about how organized and creative you are! Try one of these ideas for putting yours to work for you:
Sandpaper Every well-stocked toolbox contains sandpaper, but you'll want to reserve a spot for it in other areas of your home when you see all its uses! Use it in your:
Shoe Pocket Organizers With this little organizing trick in your pocket, you'll create storage space you never knew you had. Those transparent plastic or mesh shoe holders you hang on the back of your closet door are nothing less than a pocketful of miracles when it comes to maximizing on your vertical storage space! Here are just a few ideas for what to store in them:
Spring-loaded Clothespins So simple and low-tech, it's easy to overlook the power in their pinch! Next time you are near a dollar store, pick up a pack of those spring-loaded wooden clothespins. They will perform all kinds of little jobs around the house to make your life a little easy peasier. A few examples:
Tension Rods Maximize your vertical space with tension rods! No hardware or tools required to install these wherever you need to create storage.
And all these ideas are just the tip of the iceberg! Go on Pinterest or Google or just use your own imagination to find additional uses for each of these things. If you find a new one or have a favorite thing of your own, share it with me before December 27 for a chance to win a copy of James Clear’s bestselling book, Atomic Habits. (To learn more about entering the 2020 Top Tips Contest, visit www.easypeasyliving.com/news.) With a few of my favorite things, getting organized without any fancy organizing tools will be easy peasy! on't miss out! Sign up to have each new EPL Blog post delivered to your inbox each week.
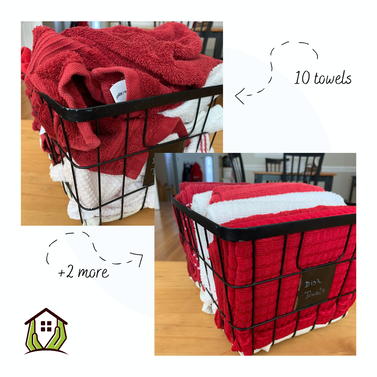 Proper folding is a great space-saver Proper folding is a great space-saver My husband used to get annoyed with me for re-loading the dishwasher after he had already loaded it. Eventually, he stopped doing that task and now just says, "I'll let you work your magic." He knows I can always get a lot more in. But it isn't "magic" at all...it's just a matter of knowing how to use the rack space efficiently. If you've been following @EasyPeasyLiving on Facebook, Instagram or this blog, you know that I've been sharing tips all month on how to create more space in your home. We started with the Declutter Challenge to get rid of all that excess stuff you don't really need. Then in last week's blog, I explained how seeking out multi-functional items to serve double-duty around the house, instead of buying multiple items that each only serve one purpose, can save a lot of storage space. This week, I'm going to share some tips for eking out even more space here and there -- without even getting rid of anything -- just by using the space you have more efficiently. While it is true that neatness does not necessarily equal organization and vice versa, it does tend to be the case that most truly organized homes are also neater. Mostly that's because it's easier to keep it neat when it's organized. But did you know that being neat can also save space? Consider a pile of papers...not that I'm encouraging you to have too many of these, mind you. Which takes up less space on a desk, a cascade of messy papers, or a neat stack of papers? When items are neatly stacked or folded, you can almost always fit more into a smaller space. Adopting a few simple strategies can make a big difference in just how much space you are able to save. Fold As you can see from the photos above, I was able to fit 20% more into the basket simply by folding the towels. Not only that, the basket fits better on the shelf where it lives and towels are more easily-accessible when they are folded. However, folding alone doesn't always result in a space savings. You must also ensure you are folding items to the right size to fit your space efficiently. Don't always fold towels the exact same way just because they are towels, or you could end up with extra, unusable space next to them on the shelf. Instead, play around and figure out how to fold them in order to fit the maximum number on that specific shelf where they are stored. You may be surprised how many more you can get in simply by changing the way you fold them. I fold the dish towels above differently than I fold the hand towels that live under my powder room sink, even though they are roughly the same size. That's because they are being stored in a different sized basket. This same principle applies to clothing, sheets, blankets...anything! It's worth taking a few minutes to figure out a folding strategy for each space! Once you do, you'll be all set. Purchase Matching Sets While matching sets look nice and neat, that's not the reason I'm advocating this. Stacking items that are part of a set is generally easier and more space-efficient than stacking individual random items. This is because items in a set are usually the same size or have been specifically designed to be nested together or stacked. Think about it: dishes, food storage containers, storage bins, mixing bowls, measuring spoons, towels, etc. tend to come in sets that are intended to be stored together. You'll save tons of space by nesting food storage containers and then "filing" the lids, by size, upright in a bin or basket so that you can easily find the size you need. Sometimes lids within a set are designed to fit a variety of different bottoms. Bundle and Contain Have you ever noticed that odd-shaped stuff has a way of spreading out all on its own? I'm talking about bags and packets in the pantry, loose contents in drawers, charger cables, empty plastic shopping bags, etc. This "clutter creep" wastes a lot of space. The way to stop it is to bundle or contain it. When you store items like this in bins, baskets, boxes or drawer dividers, you are not only defining and limiting the amount of space they consume, you can literally fit more into that space. Imagine pouring a bag of sugar out onto the countertop. What happens? It spreads out across the surface of the counter into an inefficient mound. But pouring it into a canister eliminates gaps and contains the contents, consuming a smaller surface area. The same principle applies to your oddly-shaped items. Bundling and containing them also makes items easier to find and access. Remove "Fillers" Is your closet rod too tightly packed? Consider removing all the empty hangers from the rod and placing them in a basket on the floor of your closet. It's rare that you will be storing every article of clothing you own on the rod at the same time. Usually you'll be wearing some or laundering some, so why take up precious rod space with an empty hanger? And speaking of hangers, why waste space with a thick hanger when a skinny one will do the job just as well? Invest in thinner hangers to save space. Also, keep in mind that hanging clothes is more space-efficient than folding them and storing them in drawers and makes clothes easier to see and find. Another big "filler" is the air in your off-season clothes and spare linens. Pack them in vacuum bags that eliminate the air when they are in storage. Similarly, save space in the pantry by dumping items like pasta, cereal and chips into airtight containers rather than storing big boxes that are half full of air. If freezing food in zip-loc bags, lie them flat during freezing so that they will stack neatly and save space. Go with Corners Whenever possible, choose square or rectangular storage containers over round ones, as they utilize the space more efficiently and leave fewer gaps between them. Also look for straight-sided bins rather than angled ones. It may not seem like this would make a big difference, but the space savings sure do add up. Maximize Your Vertical Space This is a big way to free up space in your home. Adjusting shelf height, using walls, backs of doors and cabinets, etc. can reap big space savings. In fact, there are so many ways to create space by going vertical that it warrants its very own blog post. I'll be covering this in more detail next week, so stay tuned. With a little bit of tweaking in the right places, saving space without even getting rid of anything can be easy peasy. 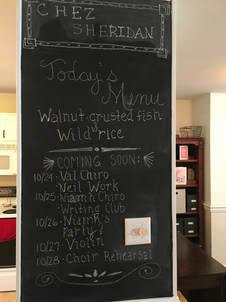 A couple of years ago, I posted about the advantages of creating a "command center" in your home to keep everyone in the family informed and on the same page in a low-tech manner. I showed you an example of the elements we included in ours here at Chez Sheridan and provided a few tips on developing your own. If you missed it, you can still read it here. While ours has served us well, I was ready for a change...something simple yet a bit fun and whimsical that everyone in the family could get into. I decided to go with a chalkboard and wanted to share with you just how easy this is! As I mentioned in my original post, an effective command center should be located in a central spot where all family members will see it. I have this weird little wall between my kitchen and the main living space in my home that makes the perfect spot, but it's also one of the first things you see when you walk in the front door. As you can see from the photo, I'm not very artistic, but part of the fun of the chalkboard is that you get to play around with it and it's a fun way to get your kids (and spouse?) involved too. I'm pretty sure I can trick my teenagers into keeping themselves informed if it involves doodling with chalk! To make your own chalk wall, all you need is chalkboard paint, painter's tape, some chalk, and an eraser. It really doesn't get any fancier than that. I bought a can of chalkboard paint for about $8.50 from WalMart and still have about one-third of it leftover after two coats on my little wall. Simply tape up the trim with the painter's tape and roll it on. It dries to the touch in less than two hours and is ready for a second coat in four hours. Allow it to dry for three days before writing on it. Then "season" it by rubbing the side of a piece of chalk all over the board. Erase it and you are open for business! As I said, I can barely draw a stick figure, but there are lots of great resources on the Internet for inspiration on fonts and designs you can use to spruce up yours. This was my first stab at it, but I look forward to getting better with practice and adding some color next time. At least my kids won't be bugging me about what's for dinner tonight and will know what's on the calendar in the coming days. Get creative and encourage other family members to contribute, too. After all, the whole idea is to foster more communication between you. The more they are looking at the board, the better the chances they'll absorb the information on it, right? Enlist their help in keeping it updated by assigning "chalkboard duty" to a specific person each day or week. Add reminders, an inspirational quote, or some seasonal doodles. My photo only shows the top half of my wall, but I deliberately left the bottom portion blank for my kids and their friends to write on. The more involved they are, the more organized and on top of things they will become. With a little chalk and some creativity, even keeping the whole family informed can be easy peasy!
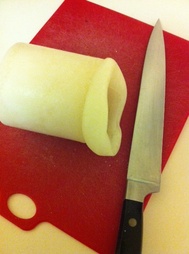
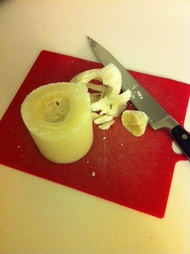
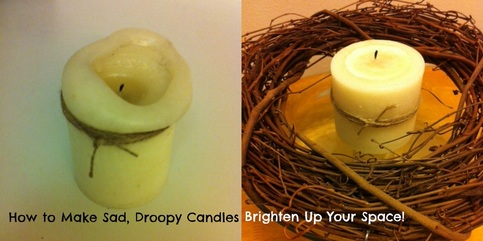 I love candles and enjoy them all year round. They add a warm, cozy glow to our dinner table during the cool months and a bug-free "stay-just-a-bit-longer" ambiance to summer nights on the back deck. They are romantic and comforting, mysterious and hypnotic all at the same time. But the neat freak in me gets uncomfortable when they start to warp and droop. I never know whether to pick off the excess wax or wait to see how long it can burn without caving in on itself. It both fascinates and frustrates me simultaneously. I much prefer a brand-new neat candle with a flat top and thus used to throw my candles away prematurely...until I found a way to keep my candles looking new until they are all used up. Best of all, it takes just a few minutes and doesn't make a huge mess. 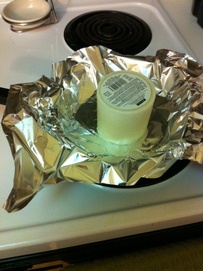 Next, cover the surface of a non-stick pan with a sheet of aluminum foil. This makes clean-up a snap and doesn't ruin your pan. Place the candle upside down on the foil and turn the burner on to medium heat. Press down on the bottom of the candle with your hand for about 30 seconds to two minutes or until the rough cut edges are smoothed out. If you cut your candle unevenly, simply press down a little harder on one side to even it out. That's it! Turn your candle over and let it cool. Turn the burner off and allow the wax in the pan to cool until it is solid enough to easily remove the foil from the pan and throw away. 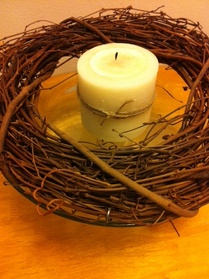 Our Lenten candle is now back in business. Easy Peasy!  Let's just face it: keeping up with everyday life is not for sissies. No matter what your station is in life...student, professional, parent, retiree...your must do/should do list always seems to outweigh your available time. As a working mother, my list seems to grow exponentially with each item I cross off. I've found that the key to keeping your sanity is organization, and the first step in getting organized is to trick yourself into a sense of control over your environment. Quieting the "visual noise" that surrounds you will help you focus on what you need to do to actually take control. Are you with me? No matter how messy your house is or how much you have on your plate, spending just 10 minutes each day to tidy up first will help put you in the right frame of mind and allow you to turn your attention to more important things on your list. Start with the things that will make a big visual impact while requiring little time/effort:
"Instead of spending time being bothered by things that you cannot control, invest your time and energy in creating the results you desire." - Jensen Siaw |
AuthorValerie Sheridan is a professional organizer, wife, mother of two, and Founder/Owner of EasyPeasy Living. Archives
October 2022
Categories
All
|

 RSS Feed